Main page
About us
Sliding Bearings Consulting
Advertising Opportunities

to Metals
to Metal properties and tests
Fracture Toughness
Dr. Dmitri Kopeliovich
Fracture is a process of breaking a solid into pieces as a result of stress.
There are two principal stages of the fracture process:
- Crack formation
- Crack propagation
Ductile fracture
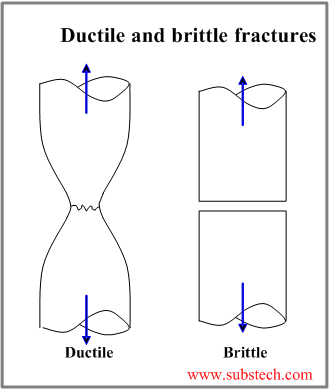
Ductile materials undergo observable plastic deformation and absorb significant energy before fracture.
A crack, formed as a result of the ductile fracture, propagates slowly and when the stress is increased.
Plastic deformation of a multi-phase material causes formation and coalescence of voids on the phase and inclusions boundaries. These voids are responsible for the specific appearance of the ductile fracture surface, consisting of numerous spherical micro-cavities (dimples), initiating formation of the crack.
Tensile specimen fractured by the ductile mechanism is characterized by the cap and cone appearance of the fracture.
Single-phase alloys and pure metals are more ductile, than metals, containing second phases or inclusions.
Brittle fracture
Brittle fracture is characterized by very low plastic deformation and low energy absorption prior to breaking.
A crack, formed as a result of the brittle fracture, propagates fast and without increase of the stress applied to the material.
The brittle crack is perpendicular to the stress direction.
There are two possible mechanisms of the brittle fracture: transcrystalline (transgranular, cleavage) or intercrystalline (intergranular).
Cleavage cracks pass along crystallographic planes through the grains.
Intercrystalline fracture occurs through the grain boundaries, embrittled by segregated impurities, second phase inclusions and other defects.
The brittle fractures usually possess bright granular appearance.
Toughness
Toughness is ability of material to resist fracture.
The general factors, affecting the toughness of a material are: temperature, strain rate, relationship between the strength and ductility of the material and presence of stress concentration (notch) on the specimen surface.
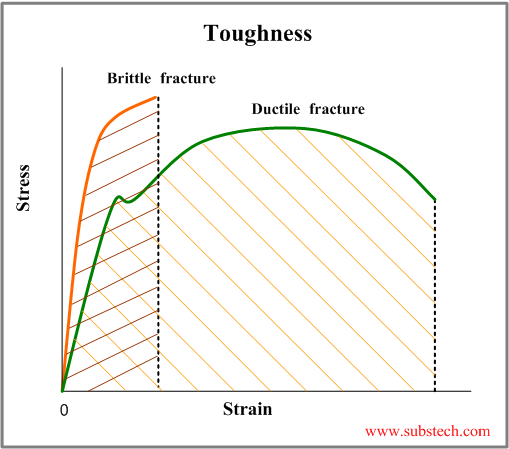
Fracture toughness is indicated by the area below the curve on strain-stress diagram (see the figure):
As seen from the diagram toughness of the ductile materials is higher than toughness of brittle materials.
Stress-intensity Factor (K) is a quantitative parameter of fracture toughness determining a maximum value of stress which may be applied to a specimen containing a crack (notch) of a certain length.
Depending on the direction of the specimen loading and the specimen thickness, four types of stress-intensity factors are used: KC, KIC KIIC KIIIC.
KC – stress-intensity factor of a specimen, thickness of which is less than a critical value.
KC depends on the specimen thickness. This condition is called plane stress.
KIC,KIIC, KIIIC – stress-intensity factors, relating to the specimens, thickness of which is above the critical value therefore the values of KIC KIIC KIIIC do not depend on the specimen thickness. This condition is called plane strain.
KIIC and KIIIC – stress-intensity factors relating to the fracture modes in which the loading direction is parallel to the crack plane. These factors are rarely used for metals and are not used for ceramics;
KIC – plane strain stress-intensity factor relating to the fracture modes in which the loading direction is normal to the crack plane. This factor is widely used for both metallic and ceramic materials.
KIC is used for estimation critical stress applied to a specimen with a given crack length:
σC ≤KIC /(Y(π a)½)
Where
KIC – stress-intensity factor, measured in MPa*m½;
σC– the critical stress applied to the specimen;
a – the crack length for edge crack or half crack length for internal crack;
Y – geometry factor.
Impact test
Impact test is used for measuring toughness of materials and their capacity of resisting shock.
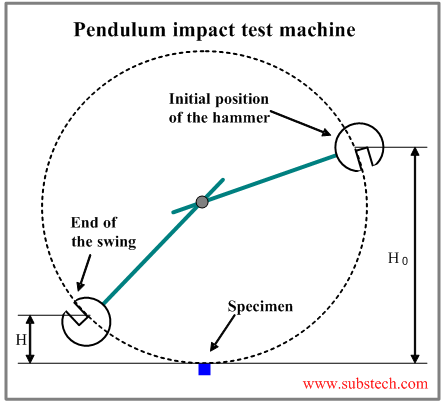
In this test the pendulum is swing up to its starting position (height H0 ) and then it is allowed to strike the notched specimen, fixed in a vice. The pendulum fractures the specimen, spending a part of its energy. After the fracture the pendulum swings up to a height H.
The impact toughness of the specimen is calculated by the formula:
a = A/ S
Where
a-impact toughness,
A – the work, required for breaking the specimen ( A = M*g*H0–M*g*H),
M - the pendulum mass,
S - cross-section area of the specimen at the notch.
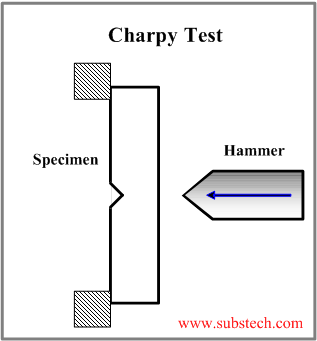
One of the most popular impact tests is the Charpy Test, schematically presented in the figure below:
The hammer striking energy in the Charpy test is 220 ft*lbf (300 J).
to top
Related internal links


