Main page
About us
Sliding Bearings Consulting
Advertising Opportunities

SubsTech’s sister website Smooth Sliding provides independent engineering consulting services that help you to solve engine bearing related issues: failures, material selection, geometry design and optimization of hydrodynamic conditions.
Smooth Sliding is an engineering consulting company run by Dr. Dmitri Kopeliovich:
- VP R&D of King Engine Bearings.
- World leading expert (32 years of experience) in design, technology and materials for Engine bearings in applications such as automotive, renewable energy, aviation, racing and others.
- Founder and owner of SubsTech (Substances & Technologies) – a leading professional website on Materials Science and Engineering.
- Author of numerous scientific and engineering publications and patents.
- Founder and owner of Smooth Sliding.
For further information and for requesting consulting services please visit our sister website Smooth Sliding.
to Metals
to Engine bearings
Engine Bearing Housing and How it Affects Engine Bearings
Introduction
The operation of an engine bearing is directly interrelated to the characteristics of three other parts: housing bore, journal and oil. Their properties, defects and dimensions affect how a bearing performs in an engine. I hope this article will supply you with items that should be considered for geometry and surface quality of the engine bearing housing.
The major geometry and surface parameters of engine bearing housings are as follows: Diameter tolerance, Surface Finish, Alignment (this characteristic is relevant only to main bearings) and Roundness. Each one of these parameters should be considered when dealing with a bearing housing bore.
to top
Diameter Tolerance
Housing diameter affects two characteristics of engine bearing operation: oil clearance and bearing press fit in the housing bore.
In general terms, the value of oil clearance = housing diameter minus bearing wall thickness x2 minus journal diameter. The bearing housing diameter should provide reliable hydrodynamic lubrication within the whole range of tolerance. Too tight a clearance (low diameter) may cause overheating of oil. Too high a clearance will increase oil leakage, lower oil pressure and may produce knocking [1]. A firmly tightened bearing has uniform contact with the housing surface, which fulfills the following functions [2]:
- prevents bearing fretting and spinning in the housing during operation
- provides maximum heat transfer through the contacting surfaces
- increases the rigidity of the housing
Too large of a diameter results in low contact pressure between the bearing back and the housing surface, which could result in the bearing spinning in the housing. Too small of a diameter may cause the material in the region of the parting line to exert an inward displacement, which reduces the gap between the journal and the bearing surfaces in this area.
King Engine Bearings has developed a software called ENSIM™ that simulates engine bearing performance under various conditions. The software has been used for determination of diameter tolerance, providing an optimal combination of hydrodynamic parameters and firm press fit of the bearings. Experiments carried out in King test rigs confirmed the theoretical calculations.
For most applications, the industry accepted housing diameter tolerance of 0.001” (0.0254mm) provides reliable bearing performance. Some racing and supercar engines require a tighter diameter tolerance 0.0005” (0.013mm).
to top
Surface Finish
Housing surface finish affects two bearing functions: heat transfer from bearing to housing and coefficient of friction between bearing back and housing. A finer surface finish increases the heat flow through the bearing-housing interface. Heat is generated by friction from the rotating journal and is partially removed by oil. However, an additional value of this heat is transferred to the housing and then dissipated. Tight and uniform contact between the bearing back and housing surfaces help to prevent overheating of the bearing material.
On the other hand, too smooth of a housing surface may permit spinning of the bearing due to a low coefficient of friction between the bearing back and the housing surface. According to [3] The static friction coefficient mean value of a milled surfaces contact is 37% greater than the value of lapped surfaces and 50% greater than polished surfaces.
The housing surface finish range of 60-90 µinch Ra is quite common in our industry. However, it is more typical from boring rather than honing. We recommend housing surface finish within a wider range of 30-90 µinch Ra. The upper limit ensures better bearing tightening but provides somewhat lower heat transfer. The lower limit creates better conditions for heat transfer but decreases friction between the bearing and housing surfaces. The surface finish range of 30-90 µinch Ra may be achieved by boring while honing will produce surface finishes closer to the lower limit of the range.
to top
Alignment
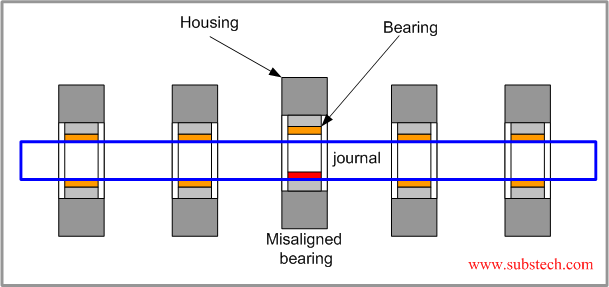
The #1 cause of main bearing failure is misalignment (deviations from concentricity) of the crankcase housings. Alternating heating and cooling of the engine along with loads transmitted by the connecting rods produce distortions (warpage) of the engine block, which may cause misalignment of the main bearing housings.
Fig.1 schematically depicts a misaligned bearing.

Fig.1 Misalignment of a main bearing housing
Misalignments may cause direct contact between the bearing and the misaligned journal pin. Misalignments are particularly dangerous for tri-metal bearings which have a thin overlay and can be removed by the contacting journal. Bi-metal bearings with no overlay are more tolerant of housing bore misalignments.
During block reconditioning, the parting surfaces of the main caps are milled or ground and then the housings are restored to their original diameter by either align boring or align honing. In principle, both operations produce aligned housings. However, align boring results in relatively high stock removal of at least 0.010” (0.254mm). Therefore, with line boring thrust faces and oil seal groove arcs may be affected. Line honing requires much less stock removal usually about 0.003”(0.076mm).
One disadvantage of align honing compared to align boring is non-uniform material removal from housings that have different widths in a block. In the honing operation, narrow housings get larger than wide ones. This occurs because the same hone stone load is applied over the surfaces with different areas. Differences in housing material properties between different housings in a block also may cause non-uniform stock removal.
Some rebuilders use both align boring and align honing machines in their operations. The first stage of alignment machining is boring, followed by the finish operation performed by align honing. In most cases, however, the align boring operation is enough to produce aligned housings with proper roundness and surface finish.
The following values of housing bore misalignment are acceptable: For tri-metal bearings: 0.001” (0.0254mm) or 0.0005” (0.013mm) for adjacent bores. For bi-metal bearings: 0.002” (0.051 mm) or 0.001” (0.025mm) for adjacent bores.
to top
Roundness
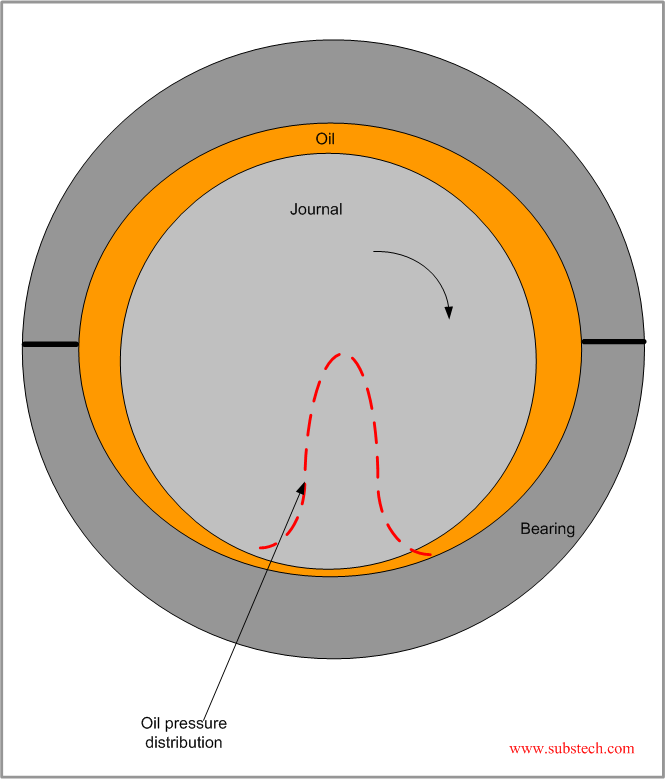
Stable hydrodynamic lubrication of a bearing is ensured by the lemon-shape profile of the bearing surface (Fig.2).
Fig.2 Lemon-shape bearing profile
Such a shape enables and allows for the creation and retention of a wedge-shaped oil gap, which is required to produce a hydrodynamic lubrication regime [4]. Oil pressure creates a supporting force separating the journal from the bearing surface. The force of oil pressure and the hydrodynamic friction force counterbalance the external load.
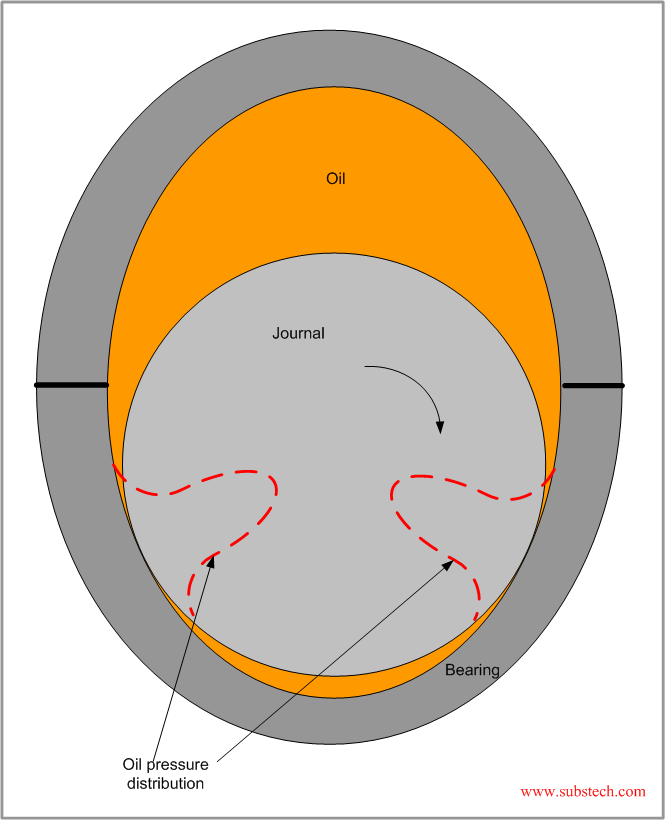
The vertical loads applied to the bearings (rod and main) cause their housings to stretch in the direction of the loads. The housing shape changes and so too does the bearing geometry (Fig.3).
Fig.3 Bearing in stretched housing
Housing distortion is due to the effect of the vertical forces generated in the engine. As a result, two oil wedges are formed instead of just one in the central zone. The summary force produced by the two pressurized zones is not enough to counteract the external load. Therefore, the journal is not separated from the bearing surface. It produces direct (non-hydrodynamic) friction. Under such conditions, load is localized at the contact areas. Specific load may easily reach the fatigue limit. Roundness of stretched and warped housing bores may be restored by boring or honing the bores.
Out-of-round is allowed only if the diameter in the horizontal direction (along the parting line) is larger than that in the vertical direction. The maximum out-of-round is 0.001” (0.025mm).
to top
Conclusions
In conclusion, here are some bullet points that all engine builders should consider when dealing with housing bores:
- Housing diameter affects oil clearance and press fit of the bearings
- For most applications, housing diameter tolerance is 0.001” (0.0254mm) or 0.0005”(0.0127mm) for some racing and supercar engines.
- Housing surface finish of 30-90 µinch Ra is acceptable for creating the optimal combination of heat transfer from the bearing and friction between the bearing and housing surfaces
- The following values of housing bore misalignment are acceptable:
- For tri-metal bearings: 0.001” (0.025mm) or 0.0005” (0.013mm) for adjacent bores.
- For bi-metal bearings: 0.002” (0.051mm) or 0.001” (0.025mm) for adjacent bores.
- The maximum out-of-round of a bearing housing is 0.001” (0.025mm).
- Restoration of alignment of the main bearing housings and producing required surface finish and roundness are achieved by line boring and/or honing
- In most cases, boring is a sufficient process for machining connecting rod and crankcase bores
References
- [1] Dmitri Kopeliovich (2018), Oil Clearance and Engine Bearings, SubsTech (Substances&Technologies), Available from http://www.substech.com/dokuwiki/doku.php?id=oil_clearance_and_engine_bearings
- [2] Dmitri Kopeliovich (2011), Geometry and Dimensional Tolerances of Engine Bearings, Engine professional, AERA., p.70-76.
- [3] B. IVKOVIC, M. DJUKDJANOVIC, D. STAMENKOVI, The Influence of the Contact Surface Roughness on the Static Friction Coefficient, Tribology in industry, Volume22, No. 3&4, 2000
- [4] Dmitri Kopeliovich (2018), EccentriX™ Optimal Eccentricity for High Performance Bearings, SubsTech (Substances&Technologies), Available from http://www.substech.com/dokuwiki/doku.php?id=eccentrix_optimal_eccentricity_for_high_performance_bearings
Related internal links
to Metals
to Engine bearings


